Introduction: Unlocking the Beauty of Your Iris
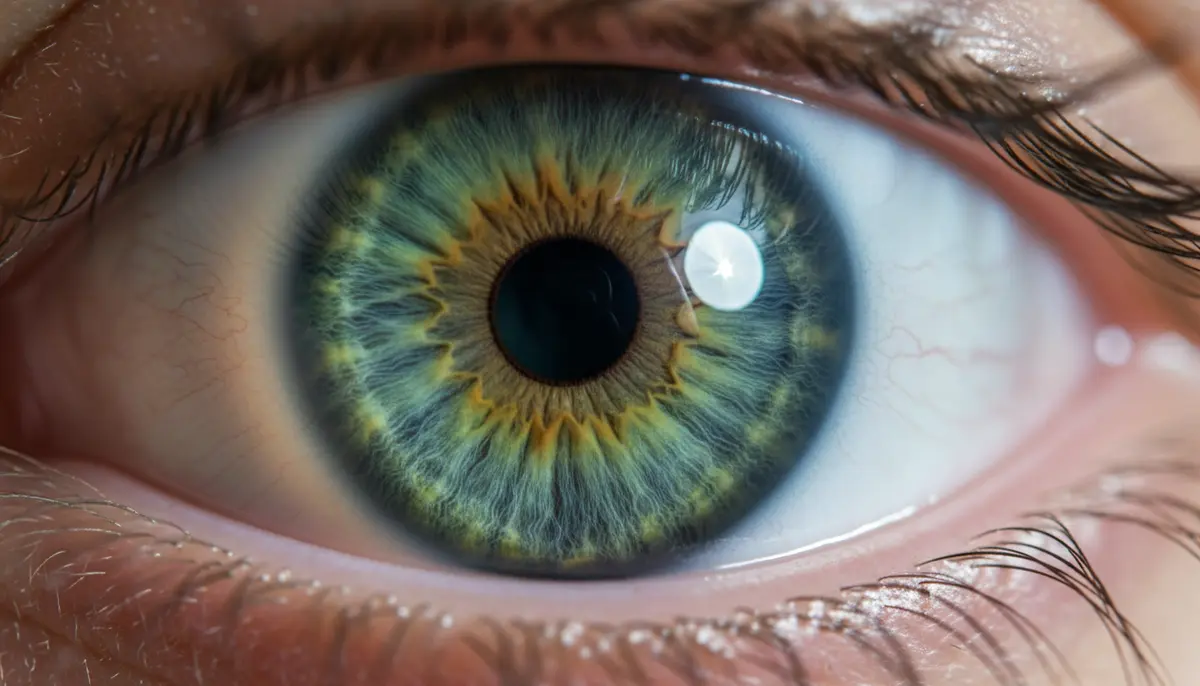
Have you ever looked closely at your own eye? The intricate patterns of the iris, the subtle shifts in color, and the unique story each one tells are truly fascinating. Capturing this beauty in a photograph can be a rewarding challenge. Many people wonder how to take a photo of your eye that truly stands out. It’s more than just pointing a camera and clicking. This guide will walk you through everything you need to know to capture stunning, detailed images of your eyes in 2025.
We’ll cover essential equipment, lighting techniques, and even post-processing tips. Whether you use a smartphone or a professional camera, you can learn how to take a photo of your eye that looks amazing. Get ready to explore a whole new world of macro photography. Let’s dive in and transform your eye into a work of art.
Why Photograph Your Eye? More Than Just a Selfie
There are many reasons why people want to learn how to take a photo of your eye. For some, it’s a creative outlet. The human eye offers endless artistic possibilities. For others, it’s about personal connection. Your eyes are unique, like fingerprints, and capturing their detail can be deeply personal.
- Artistic Expression: The iris is a natural canvas of patterns and colors.
- Personal Keepsake: A unique portrait of your inner self.
- Health Monitoring: Sometimes, changes in the eye can indicate health issues, making a detailed photo useful for tracking.
- Sharing Online: Showcase the incredible detail of your eyes on social media.
- Professional Applications: Used by opticians or for forensic purposes.
Whatever your motivation, mastering how to take a photo of your eye opens up a fascinating niche in photography. It allows you to see yourself, or others, in a completely new light. The results can be truly breathtaking.
Essential Gear for Capturing Your Eye
Before you learn how to take a photo of your eye, you need the right tools. The good news is, you might already have some of them. We’ll look at both smartphone and dedicated camera setups. Each has its own advantages.
1. Smartphones: Your Pocket Powerhouse
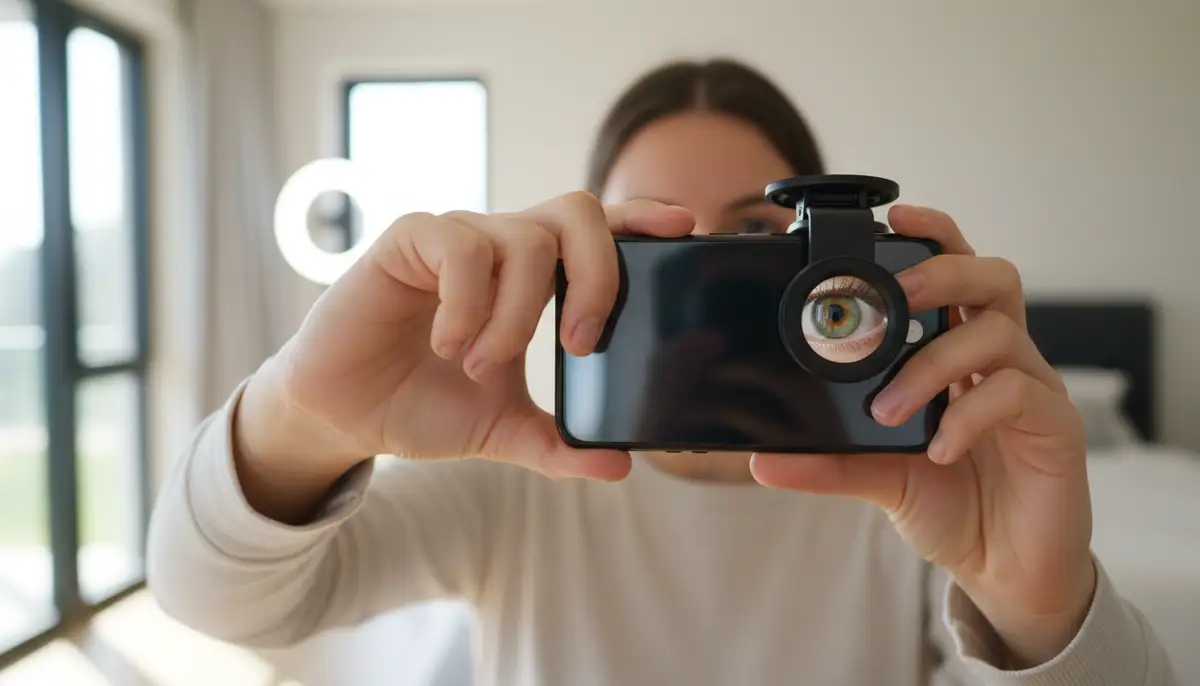
Modern smartphones have incredible cameras. Many can capture impressive detail. However, getting a true macro shot of your eye usually requires a little extra help. You’ll need some accessories to truly learn how to take a photo of your eye with your phone.
- Macro Lens Attachment: This is crucial. Clip-on macro lenses magnify your subject, allowing for extreme close-ups. Look for 10x or 15x magnification for best results.
- Tripod/Stabilizer: Holding your phone perfectly still is hard. A small tripod or a stable shot camera mount will prevent blurry photos.
- Good Lighting: Natural light is best, but a small LED ring light can make a huge difference.
- Remote Shutter: Using a Bluetooth remote or your phone’s volume buttons avoids camera shake when pressing the screen.
2. DSLR/Mirrorless Cameras: For Serious Detail
If you’re serious about macro photography and want the highest quality, a dedicated camera is the way to go. This setup offers more control and superior image quality. It’s the professional’s choice for how to take a photo of your eye.
- Macro Lens: A true macro lens (e.g., 100mm f/2.8) is essential. These lenses offer 1:1 magnification, capturing life-size detail.
- External Flash/Ring Light: A dedicated flash or a macro ring light provides even, powerful illumination. This is key for bringing out iris details.
- Tripod: A sturdy tripod is non-negotiable for sharp macro shots. Even tiny movements blur the image.
- Remote Shutter Release: Just like with smartphones, a remote helps avoid camera shake.
- Focus Rail (Optional): For advanced users, a focus rail allows precise adjustments for focus stacking.
Setting the Scene: Lighting is Everything
Lighting is the most critical factor when learning how to take a photo of your eye. Poor lighting leads to dull, flat images. Good lighting reveals every stunning detail of the iris. You need even, bright light without harsh shadows or reflections.
Natural Light Techniques
The best natural light comes from a large window. Position yourself or your subject facing the window. This provides soft, diffused light. Avoid direct sunlight, as it creates harsh shadows and makes the subject squint. Overcast days are perfect for natural light photography.
- Positioning: Sit or stand about 1-2 feet from a large window.
- Angle: Ensure the light hits the eye directly, minimizing shadows from eyebrows or eyelids.
- Reflections: Watch out for reflections of the window frame in the eye. Adjust your angle slightly to avoid them.
Artificial Light Solutions
Artificial light gives you more control. This is especially useful if natural light isn’t available or consistent. For how to take a photo of your eye, a ring light is often the go-to choice.
- Ring Light: A small LED ring light placed around your lens provides even, shadow-free illumination. It also creates a pleasing circular catchlight in the pupil.
- Softbox/LED Panel: If you have a larger setup, a small softbox or LED panel can provide beautiful, diffused light. Position it slightly above and to the side of the eye.
- External Flash with Diffuser: For DSLR/mirrorless users, an external flash with a diffuser (like a softbox attachment) can freeze motion and provide intense, controlled light.
The key is diffusion. Hard light creates harsh shadows and unflattering highlights. Soft, even light is your best friend when learning how to take a photo of your eye.
Smartphone Photography: Step-by-Step for Your Eye
Ready to learn how to take a photo of your eye using just your phone? This method is accessible and can produce surprisingly good results. Follow these steps for the best outcome.
1. Prepare Your Setup
- Clean Your Lens: A smudge on your phone lens will ruin your photo. Use a microfiber cloth to wipe it clean.
- Attach Macro Lens: Carefully clip your macro lens attachment onto your phone, ensuring it’s centered over the main camera lens.
- Mount Your Phone: Place your phone securely on a mini tripod or a stable stand. This is crucial for sharpness.
- Set Up Lighting: Position your ring light or sit near a window.
2. Position Yourself (or Your Subject)
If you’re photographing your own eye, this can be tricky. You might need a mirror to help. For someone else, it’s easier to guide them. The University of Iowa Health Care offers a great resource on how to capture images and video of your eyes, suggesting holding the camera about 4 inches away.
- Keep Still: Minimize head movement. Rest your chin on a table or use a headrest if possible.
- Open Wide: Gently hold your eyelids open with clean fingers if needed, but avoid straining.
- Look Straight Ahead: Or slightly to the side, depending on the desired angle. Avoid looking directly at the camera lens to prevent a black pupil.
3. Camera Settings and Focus
Most phone cameras are automatic. However, you can still optimize settings. Many photography apps, like Camera ZOOM FX, offer manual controls. This allows you to take stunning photos with greater precision.
- Use Manual Mode (if available): Set ISO as low as possible (100-400). Adjust shutter speed for proper exposure, usually around 1/60 to 1/125 second.
- Tap to Focus: Tap on the iris on your phone screen to set the focus point. This tells the camera exactly where to be sharp.
- Adjust Exposure: Drag the exposure slider up or down to brighten or darken the image. You want the iris to be well-exposed, not blown out or too dark.
- Zoom (Digital Zoom with Caution): Only use digital zoom if absolutely necessary, and sparingly. It reduces image quality. The macro lens attachment should provide enough magnification.
4. Take the Shot!
Once everything is set, it’s time to capture the image. Remember, patience is key when learning how to take a photo of your eye.
- Use a Remote Shutter: This prevents any camera shake from pressing the screen.
- Burst Mode: Take several shots in quick succession. This increases your chances of getting a perfectly sharp image, especially if you or your subject blinks.
- Review and Adjust: Check your photos immediately. Are they sharp? Is the lighting good? Adjust and retake as needed.
Advanced Techniques with DSLR/Mirrorless Cameras
For photographers with dedicated cameras, the process for how to take a photo of your eye involves more technical control. The results, however, can be truly professional-grade. This is where you can achieve incredible detail and clarity.
1. Camera Settings for Macro Eye Shots
- Mode: Shoot in Manual (M) mode for full control.
- Aperture (f-stop): Start with f/8 to f/11. A higher f-number increases depth of field, keeping more of the iris in focus. However, it also requires more light.
- ISO: Keep ISO as low as possible (100-400) to minimize noise. Only increase if absolutely necessary for proper exposure.
- Shutter Speed: Use a fast enough shutter speed to prevent blur from minor movements, typically 1/125 to 1/250 second. If using flash, you can often go slower (e.g., 1/60s) as the flash duration freezes motion.
- White Balance: Set to ‘Daylight’ or ‘Flash’ depending on your light source, or use custom white balance for precise color.
- File Format: Always shoot in RAW. This gives you the most flexibility for post-processing.
2. Mastering Focus for Pin-Sharp Eyes
Achieving perfect focus is paramount when learning how to take a photo of your eye. Macro photography has a very shallow depth of field, meaning only a tiny sliver will be in focus.
- Manual Focus: This is often preferred for macro. Switch your lens to manual focus (MF). Use Live View on your camera’s screen and zoom in 5x or 10x on the iris. Carefully turn the focus ring until the iris details are tack sharp.
- Autofocus (AF) with Limitations: Some cameras have excellent autofocus. If using AF, select a single, small AF point and place it directly on the iris. Be aware that AF can sometimes ‘hunt’ or focus on eyelashes instead.
- Focus Peaking: Many mirrorless cameras offer focus peaking, which highlights in-focus areas. This is a huge help for manual focusing.
3. Lighting with External Flash/Ring Light
External lighting is where DSLR/mirrorless cameras truly shine. It provides the power and control needed to make your eye pop.
- Ring Flash: Attaches to the front of your macro lens, providing perfectly even, shadowless light. This is ideal for illuminating the iris.
- Twin Macro Flash: Two small flashes mounted on either side of the lens. This gives more directional control and can create more sculpted light.
- Off-Camera Flash: A single speedlight or studio strobe positioned above and slightly to the side, diffused through a small softbox. This creates beautiful, soft light with a subtle catchlight.
Experiment with your lighting setup. The goal is to illuminate the iris evenly, bringing out its texture and color without harsh reflections. This is a crucial step in how to take a photo of your eye professionally.
The Subject: Making Your Eye Photo-Ready
The eye itself needs a little preparation to look its best. These simple tips will help you capture a clear, vibrant image. Remember, the subject is key when you want to know how to take a photo of your eye.
- Rest Your Eyes: Avoid taking photos when your eyes are tired or bloodshot. Get good sleep the night before.
- Eye Drops: Use lubricating eye drops (artificial tears) a few minutes before the shoot to reduce redness and ensure clarity.
- Minimize Blinking: It’s natural to blink. Take many shots in burst mode to catch moments between blinks. You can also gently hold your eyelids open.
- Control Pupil Size: The size of your pupil changes with light. A smaller pupil reveals more of the iris. Use bright, continuous light (like a ring light) to constrict the pupil slightly. Avoid very dim light, which dilates the pupil and hides the iris.
- Cleanliness: Ensure there’s no makeup residue or dust around the eye.
Composition and Angles: Framing Your Eye
Once you know how to take a photo of your eye technically, consider the artistic side. Composition makes your photo truly captivating. It’s about how you frame the shot and what you choose to include.
- Fill the Frame: For a true macro shot, the eye should dominate the frame. Crop tightly to focus on the iris.
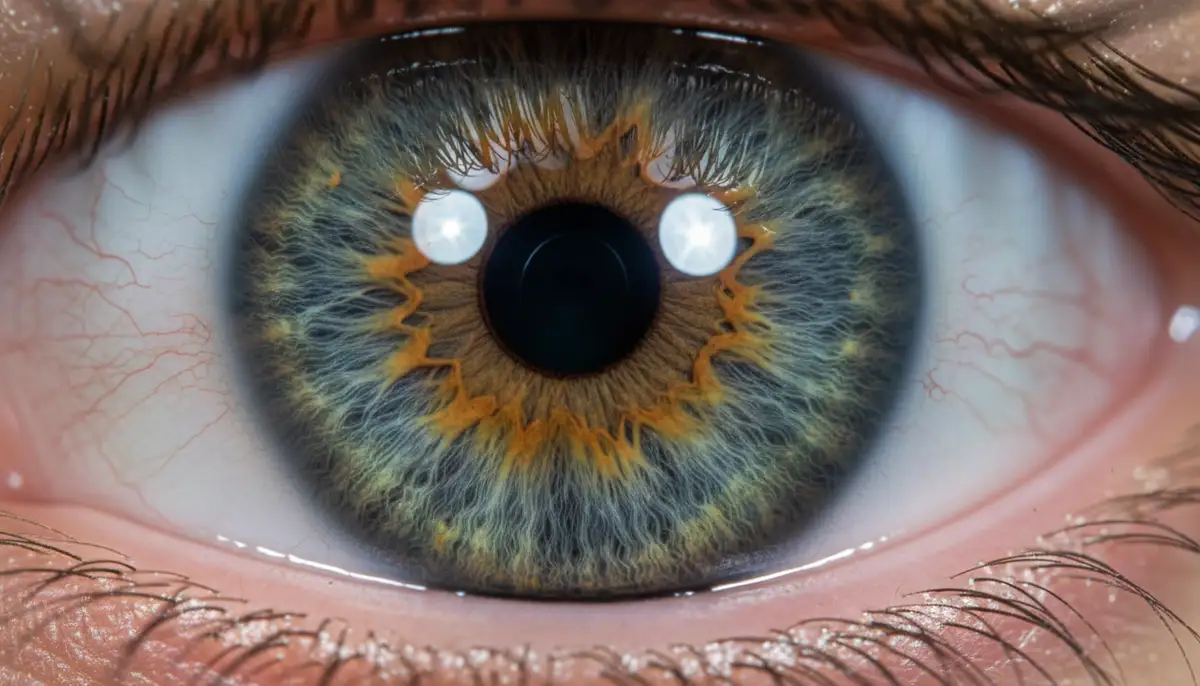
- Catchlight: Ensure there’s a pleasing catchlight (reflection of your light source) in the pupil. A ring light creates a beautiful circular reflection.
- Angles: Experiment with slight angles. A straight-on shot is classic, but a slightly angled shot can add depth. Have the subject look slightly away from the camera to reveal more of the iris.
- Eyelashes and Brows: Decide if you want to include parts of the eyelashes or eyebrow. Sometimes, a tight crop focusing only on the iris is most impactful.

Don’t be afraid to experiment. Review your shots on your camera or phone screen. See what angles highlight the unique patterns of the iris best. This iterative process is part of learning how to take a photo of your eye effectively.
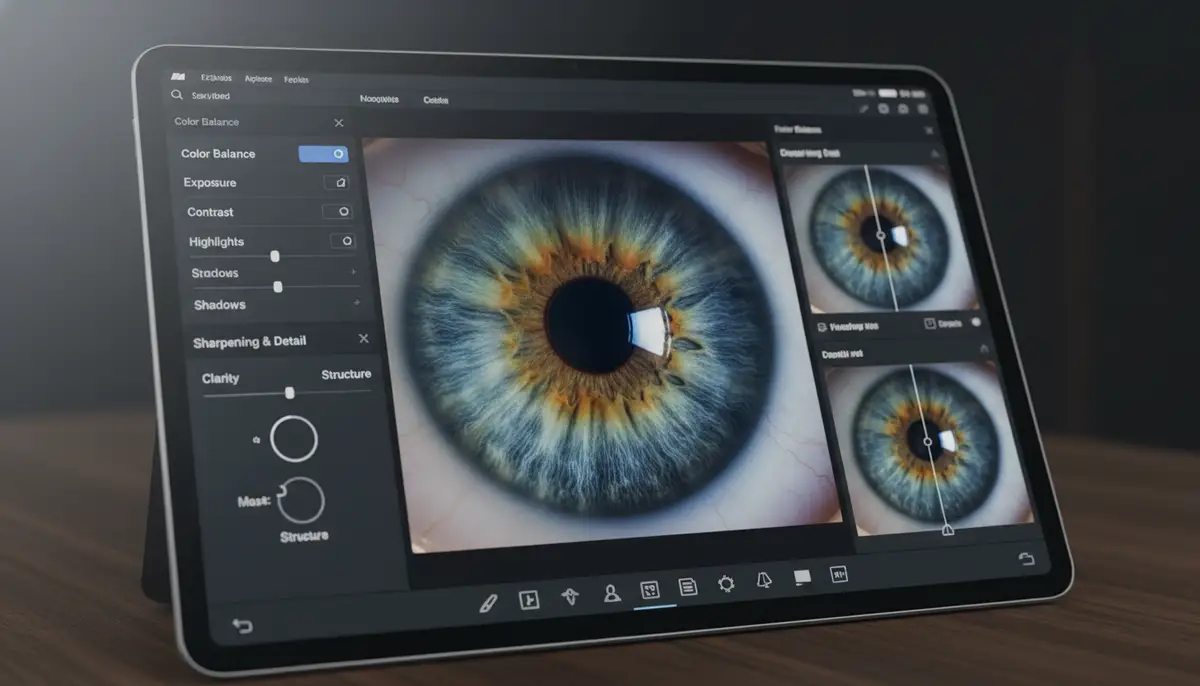
Post-Processing Your Eye Photos: The Finishing Touches
Taking the photo is only half the battle. Post-processing can transform a good eye photo into an extraordinary one. This is where you enhance details, correct colors, and refine the image. Many apps and software help you apply photo effects to bring out the best in your eye shots.
Essential Editing Steps
- Cropping and Straightening: First, crop your image to focus tightly on the eye. Ensure it’s perfectly straight.
- Exposure and Contrast: Adjust brightness and contrast to make the iris pop. Be careful not to overdo it, which can make the image look unnatural.
- White Balance and Color Correction: Ensure the whites of the eyes are truly white, not yellow or blue. Enhance the natural colors of the iris without making them oversaturated.
- Sharpening: Apply a subtle amount of sharpening to bring out the intricate details of the iris. Be gentle; too much sharpening creates an artificial look.
- Clarity/Texture: Use clarity or texture sliders sparingly to add definition to the iris patterns.
- Spot Removal: Gently remove any dust spots, stray eyelashes, or small blemishes on the whites of the eyes or surrounding skin.
- Vignette (Optional): A slight dark vignette can help draw the viewer’s eye towards the center of the image.
Recommended Editing Tools
There are many great tools available for editing. For mobile users, apps like Camera ZOOM FX offer powerful editing capabilities right on your device. Other popular options include PicsArt, Snapseed.online, and VSCO.co. For desktop, Adobe Lightroom and Photoshop are industry standards.
| Editing Task | Smartphone App (Examples) | Desktop Software (Examples) |
|---|---|---|
| Basic Adjustments (Exposure, Contrast) | Camera ZOOM FX, Snapseed.online, VSCO.co | Lightroom, Photoshop, GIMP |
| Sharpening & Detail Enhancement | Camera ZOOM FX, PicsArt | Lightroom, Photoshop |
| Spot Removal & Retouching | PicsArt, Snapseed.online | Photoshop, Affinity Photo |
| Color Grading & Filters | Camera ZOOM FX, VSCO.co | Lightroom, Capture One |
The goal is to enhance, not transform. You want to highlight the natural beauty you captured when you learned how to take a photo of your eye. Subtle edits often yield the best results. Don’t be afraid to experiment with different settings and see what works best for your specific image.
Common Challenges and Solutions When You Take a Photo of Your Eye
Even with the best preparation, you might encounter some hurdles. Here are common problems and how to overcome them when you try to take a photo of your eye.
- Blurry Images: This is usually due to camera shake or improper focus. Use a tripod and remote shutter. For manual focus, zoom in on Live View. Ensure your camera is a stable shot camera.
- Harsh Reflections: Adjust your lighting source or your position slightly. Use diffusers to soften the light. Avoid direct, undiffused light.
- Red Eyes/Bloodshot: Use lubricating eye drops before the shoot. Ensure adequate rest. You can also reduce redness in post-processing.
- Pupil Too Large: This means your lighting is too dim. Increase the brightness of your continuous light source or use a flash to constrict the pupil.
- Subject Blinking Too Much: Take many photos in burst mode. Try to capture the moment just after a blink, or have the subject gently hold their eyelids.
- Lack of Detail: You might not be close enough, or your macro lens isn’t powerful enough. Ensure proper lighting, as light reveals detail.
Patience and practice are your best tools. Each attempt teaches you more about how to take a photo of your eye. Don’t get discouraged by initial failures.
Turning Your Eye Photo into Stunning Art
Once you’ve mastered how to take a photo of your eye, what’s next? Many people transform their high-resolution eye images into incredible works of art. This niche, known as iris photography, is gaining popularity.
Companies specialize in taking professional iris photos and turning them into prints, jewelry, and other unique products. For example, Iris Photo | Turn your eye into stunning artwork offers various ways to display your unique eye. Similarly, Welcome to Eyemazy® | Iris Photography provides unsurpassed high-resolution iris photography, transforming eyes into personal art. You can get large prints, digital files, or even gift cards for this unique experience.
- Prints and Canvases: Display your eye photo as a striking piece of wall art.
- Jewelry: Some services can embed your eye photo into pendants or other jewelry.
- Digital Art: Use your eye photo as a base for digital painting or graphic design.
- Personalized Gifts: Create unique gifts for loved ones featuring their eyes.
The beauty of learning how to take a photo of your eye extends beyond just the digital file. It’s about celebrating the intricate, personal artistry found within each of us.
Conclusion: Your Journey to Perfect Eye Photography
You’ve now learned the comprehensive steps on how to take a photo of your eye. From selecting the right gear, mastering lighting, and perfecting focus, to post-processing and artistic applications, you have all the knowledge to begin. Remember that practice makes perfect. Your first few attempts might not be flawless, but each one will bring you closer to capturing that stunning, detailed shot.
Experiment with different angles, light sources, and editing techniques. Don’t be afraid to try new things. Whether you’re using a smartphone with an app like Camera ZOOM FX or a professional DSLR, the world of macro eye photography is waiting for you. Get out there and start capturing the incredible beauty of the human eye. We can’t wait to see your unique creations!